Showing posts with label pretty. Show all posts

21 May 2013

A little piece of Heaven (& Earth)


MUA (Make Up Academy)’s Heaven & Earth Palette is, indeed, one of the diamonds as far as their palettes are concerned. 

This was the first “Naturals” Palette that MUA released; comprising 12 gorgeous shades in rich earthy tones that were sure to compliment any eye colour and it was, unsurprisingly, one of their best sellers. 


Top row, shades 1-3
Bottom row, shades 7-9

Top row, shades 4-6
Bottom row, shades 10-12
 
All of the shades have a degree of shimmer to them but the highlight shades are by far the most shimmery; the other shades range from the classic mid tones right through to shades that are perfect for contouring. 


The best thing about this palette is that the shades are all incredibly buildable and, as such, can be used to either give a light wash of colour on the lid or can be built up for a more sultry smoky eye. 

Recently this gem of palette has been rather eclipsed by its newer friends; The Undressed Palette and Undress Me Too.  These 2 palettes were, by far, 2 of the most eagerly awaited palettes from MUA as they are hailed as perfect dupes for Urban Decay’s Naked and Naked2 Palettes, but at fraction of the price. 

That said, there was a time when the Heaven & Earth palette was repeatedly sold out both in store and online and one of the most common questions I saw posted to MUA’s Twitter and Facebook feeds was “When will Heaven & Earth be back in stock?” 

I too have been guilty of neglecting Heaven & Earth in favour of the Undressed/Undress Me Too so, today when I was trying to decide what eye look I felt like, I “re-discovered” this little treasure tucked away in my eyeshadow draw and decided that it was time to bring it out and put it to good use. 

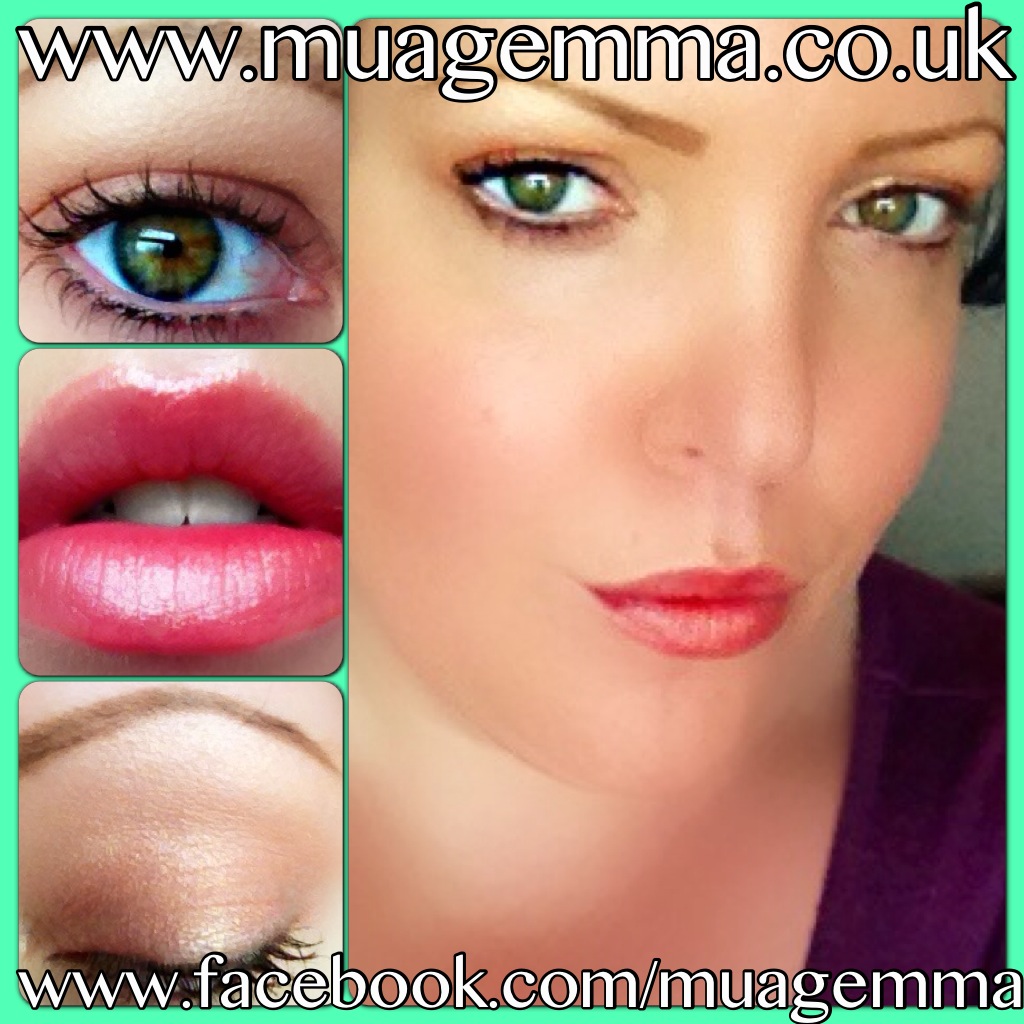
Looking at the palette this morning, I remembered why this was the must have palette at one point and, although I didn’t altogether know what look I was going to create today, I went with what felt right and I ended up with the following result:


The beauty of this look is, because it is designed for the colours to merge together, I only used 1 brush for entire thing (MUA’s E3 Blending & Shadow Brush) and achieved the look as follows:

  • Work shade 8 all over the eyelid, up to the crease (until desired colour intensity is reached)
  • Blend shade 10 through the crease and into the outer contour
  • Apply a small amount of shade 4 above the shade 10 and blend up towards the brow
  • Pop a small amount of shade 1 directly under the brow and in the inner corner of the eye
  • Finally blend the smallest amount of shade 6 over the eyelid to warm the look 
  • Line the top lash with a brown eyeliner (MUA do one that would be perfect, see here) and then, with whatever product is left on the brush, work it under the lower lashes 
  • Apply 2 coats of your favourite mascara/false lashes
  • Finish the look with a slick of white/neutral eyeliner on the waterline (I used MUA’s Intense Colour Eyeliner Pencil in Snow White)

After I posted the picture to my Instagram, Twitter and Facebook Pages I was really surprised at how many likes and positive comments I received.  I was also complimented on my “gorgeous eyes” today too!

Perhaps if you have a Heaven & Earth Palette in your collection that you may have been neglecting lately, go and find it and remind yourself just why it was, at one point, your must have palette!

Until next time, stay beautiful.
~ Gem x 


DISCLAIMER
All of the views expressed within this blog are mine and mine alone. 
I am in no way affiliated or financially involved with MUA, fbBeauty or any of their employees. 
All of the products mentioned within this post are mine and were bought and paid for by me. 
All of the images in this blog are taken by me, unless stated otherwise.  PLEASE DO NOT take, use, edit or otherwise use any of the images herein without my prior knowledge and express written consent. 


17 April 2013

Fibro Face

You'd be forgiven for looking at the title of this post and wondering just what it is I'm going to write about, so let me shed some light on the situation. 

I make no secret of the fact that I am living with Fibromyalgia, Chronic Fatigue Syndrome and Joint Hypermobility Syndrome but, as much as possible, I try not to let it affect my Make Up World although sometimes, understandably, the 2 collide - today is one of those days.  

I had a very busy day yesterday working at a Hair Show put on by a local College and, today, I'm paying for it. 

Long story short is that this morning when I woke up I felt incredibly rough and have been in considerable pain all day.  

Usually when I am feeling this bad I don't bother with make up, however, today I thought that I would at least try and put something together. I have occasions when I feel like this and have no choice but to go out, for example on the School Run, and the last thing I want to do is face the general public without some sort of face on, least of all when I am feeling (and looking) beastly.  When those occasions present themselves, this is usually the sort of look I go for (hence the name Fibro Face), so I thought I would share it. I'm not saying you need to have Fibro in order to wear this make up, after all, we all have rough days where we could, at least, do with looking better than we feel, so I hope this post helps people achieve that. 

When you're feeling horrible, the last thing you really want to be doing is spending ages doing your make up or worrying about getting it looking too perfect, so the products I've chosen are all easy to work with and are great for perking the skin up.  

© Gemma Peters - Make-Up Artist 2013
The biggest problem I have when I feel rough is that my skin automatically shows it. This can be through my face looking dull and/or very tired looking eyes.  

As this particular make up look doesn't use a lot of products, I decided that I wouldn't use a primer but, of course, if you prefer to do this then you can.  

The first product I applied after moisturising was Famous Cosmetics' Bronze Highlighter. This is a liquid Bronzer with a gorgeous shimmer in it.  I applied this across my cheekbones, down my nose and across my forehead (all the places that the sun naturally hits). This instantly lifted and brightened my skin and, generally, made me look healthier.  

It's not necessary to put foundation over the top of the bronzer but, out of personal preference, I then applied Almay Pure-Blends foundation; this product is more like a tinted moisturiser and I therefore applied it as a moisturiser. Rather than leave my skin looking like it had product on, it just helped even the skin tone out and added a healthy glow. 

I then applied a little of MUA (Make Up Academy)'s Radiant Under Eye Concealer from their "Undress Your Skin" Range. I applied this under/around the eye area and blended it in gently with finger - this instantly brightened my eyes and helped to stop me looking so tired and worn out. 

If you don't suffer with skin prone to shine you could skip straight to blusher but, because I am prone to shine/oily patches, I dusted a little of MUA's Matte Perfect loose powder across my t-zone and chin.  

To add a healthy flush to my cheeks I wanted a subtle coloured blusher that also had some shimmer in it. Accessorize's Merged Baked Blusher has just the right amount of shimmer in it to pick the skin up and, because it is merged, it has a flattering combination of tones to suit most skin.

Moving on to the eyes. I didn't want the "heaviness" of an eye shadow, nor the intense shimmer of a pearl shadow.  I decided that MUA's Shimmer Kisses Bronzer would be an excellent alternative.  It has 4 squares of complimentary colours that, when merged together, provide a beautiful wash of highlight for the face but, used separately, can be a perfect alternative for eyeshadow.  

I used the shade on the bottom left of the palette across the eyelid and then blended the shade in the top right into the crease of my eye, up towards the browbone.  I then put a little of the shade in the bottom right of the palette under the eyebrow and in the inner corner of my eye to brighten it.  

To finish the eye look I used 2 coats of MUA's brown mascara and put a slick of their white eyeliner in the waterline.  

I have to define my eyebrows (on account of them being practically non-existent) but, rather than use my usual darkest shade, I used a blonde shade instead, which automatically made my face look less harsh and "done". It looks much more natural, and very pretty too. 

I finished the overall look by applying Look Beauty's Pout Stain in Pucker Up Peach to line the lips and add more of an even tone to them and then topped with a slick of Revlon's Lip Butter in Peach Parfait.  

This look isn't as heavy as some of my recent looks but for perking up the face and making me feel a little better about myself it is perfect. I also think this would be a good look for Summer parties, etc., as it is minimalistic yet pretty. 

© Gemma Peters - Make-Up Artist 2013
You can find more examples of my "Face of The Day" over on my Facebook Page.  

Until next time, stay beautiful.
~ Gem xx


DISCLAIMER
All of the views expressed within this blog are mine and mine alone.  
I am in no way affiliated with any of the companies/products mentioned or their employees. 
All of the products mentioned within this post are mine and were bought and paid for by me.
All images in this Blog are taken by me, unless stated otherwise. PLEASE DO NOT take my photos without my express knowledge and consent.  

12 April 2013

Here's LOOK(ing) at You

Today's post is all about nails; specifically Look Beauty!  


I have been playing with their "Winter Brights" Nail Varnish set which contains 3 gorgeously bright polishes; the pink is Shade 22 Prom, Shade 9 Fluro is the orange and Shade 3 Flare is the purple. The fourth shade is Shade 24 Sequin Effect.  

© Gemma Peters - Make-Up Artist 2013
The set is available to buy from their website and retails for £12.00. 

The set is described as follows: 
"Winter is the perfect season to add some colour intensity to your nails and cast away those winter blues. This collection also contains an amazing top coat that transforms any shade into a gorgeously sparkling sequin effect - genius!"

© Gemma Peters - Make-Up Artist 2013
I completely agree with the description. This winter has been especially long and hard, so I am always looking for ways to inject a little colour into my day, either with bright nail colours or through the medium of make up.  

I think that bright nails look good at any time of year though. In winter they can brighten your mood; through Spring and Summer it's great to have bright, happy colours to match the weather (hopefully the "Great British Weather" will join in with Summer this year) and in Autumn, I especially love bright oranges, golds and greens.  

© Gemma Peters - Make-Up Artist 2013
I couldn't decide which of these 3 beautiful colours to use so, you probably guess, I decided to use all 3 in an alternating fashion and use the sequin effect polish to accent the ring finger on each hand.  

This is the first time that I have used Look's Nail Pop and I really was very pleased with the coverage.  1 coat of these polishes is more than sufficient to give a perfect, full cover of colour to the nail. The formula goes on smoothly and doesn't have that "sticky" feeling at application.  It also dries very quickly to a glossy, rock hard finish.  

© Gemma Peters - Make-Up Artist 2013

I did apply a second coat of colour to my nails but, in no way, was this needed; it was purely through personal preference

Once I had given the colours sufficient time to dry I went on to apply the sequin top coat.  I love this top coat.  It has a generous amount of green/holographic glitter shards (of different sizes) and applies as well as the colours in the kit.  


When the top coat had had the time to dry it reminded me of an Opal Stone; the way the glitter catches the light and the colours dance is stunning.  I can't wait to try it over different shades of polish.  

The photo doesn't do the top coat the justice it deserves, but I hope you can get an idea of how pretty it is. 

© Gemma Peters - Make-Up Artist 2013
After trying this kit I'll definitely be getting myself a few of the other kits; I rather fancy the look of the "Glitz and Glam" kit and the limited edition single Nail Pop in "Cool Britannia". 


Until next time, 
Stay Beautiful ~ Gem x


DISCLAIMER
All of the views expressed within this blog are mine and mine alone.  
This product was sent to me by Look Beauty for the purpose of this review/blog.
All images in this Blog are taken by me, unless stated otherwise. PLEASE DO NOT take my photos without my express knowledge and consent.
 

Blog Template by YummyLolly.com
Sponsored by Free Web Space