27 August 2012

Going For Gold - eye make up tutorial

Hello you lovely lot! 

As promised here is the tutorial to recreate this gorgeous "Going For Gold" eye make up look: 

© Gemma Peters - Make-Up Artist 2012

The products that you will need to re-create this look are: 

© Gemma Peters - Make Up Artist 2012

1)  Make Up Academy (MUA) Pearl Eyeshadow in Shade 1 (£1.00)
2)  Make Up Academy (MUA) Going For Gold Eyeshadow Palette (Limited Edition £4.00) 
3)  Make Up Academy (MUA) Gel Eyeliner in Underground (£3.00)
4)  Make Up Academy (MUA) Intense Colour Eyeliner Pencil in Jet Black (£1.00)
5)  Make Up Academy (MUA) Every Lash Volume & Lengthening Mascara in Black (£3.00) 
6)  Make Up Academy (MUA) Intense Colour Eyeliner Pencil in Snow White (£1.00 not pictured)


Step One:
Load a fluffy brush with the pearl eyeshadow and apply this all over your eyelid, working from your lash line, right up to underneath your eyebrow.  I do this with pretty much any eye look I create as I find it helps to create a really nice base for your other eyeshadows and it also provides a perfect highlight for under the brow and in the inner corner of the eye too.

© Gemma Peters - Make Up Artist 2012
Step Two:
Load Shade 7 (2nd one on the bottom row) of Going For Gold onto the same fluffy brush that you have just used and apply it over your eyelid from your lash line up to the crease. I also blend it into the crease and slightly over as I find this helps to add depth to the overall look. 

© Gemma Peters - Make Up Artist 2012 
© Gemma Peters - Make Up Artist 2012
Step Three:
Using a flat rounded brush load Shade 9 from Going For Gold onto the brush and then gently apply that over the outer 3/4 of your eyelid, over the Shade 7 that is already there.  This really helps to add depth to the colour and gives a deeper shade of gold. I also work this up to (and slightly over) the crease in order to give even more drama to the overall look. 

© Gemma Peters - Make Up Artist 2012

© Gemma Peters - Make Up Artist 2012
Step Four: 
Using a soft angled brush load Shade 5 from Going For Gold onto your brush and then work it into the crease of your eye and outer corner.  This helps add definition and shape to the eye, as well as adding depth of colour (as we are working with colours from the same family).

© Gemma Peters - Make Up Artist 2012
Step Five: 
This is when I define my brows. I appreciate that some people like to do this before they start applying their eye make up, some people wait until the end and some people skip this step altogether. This is just the way I do things.  

© Gemma Peters - Make Up Artist 2012
Step Six: 
Firstly working with the gel liner in Underground (a gorgeous matte black) I apply, at first, a thin line right next to my lash line. I gradually thicken the line in accordance with the sort of look I want to achieve.  For this particular look I did quite a thick line, but did not wing it out.
 
© Gemma Peters - Make Up Artist 2012
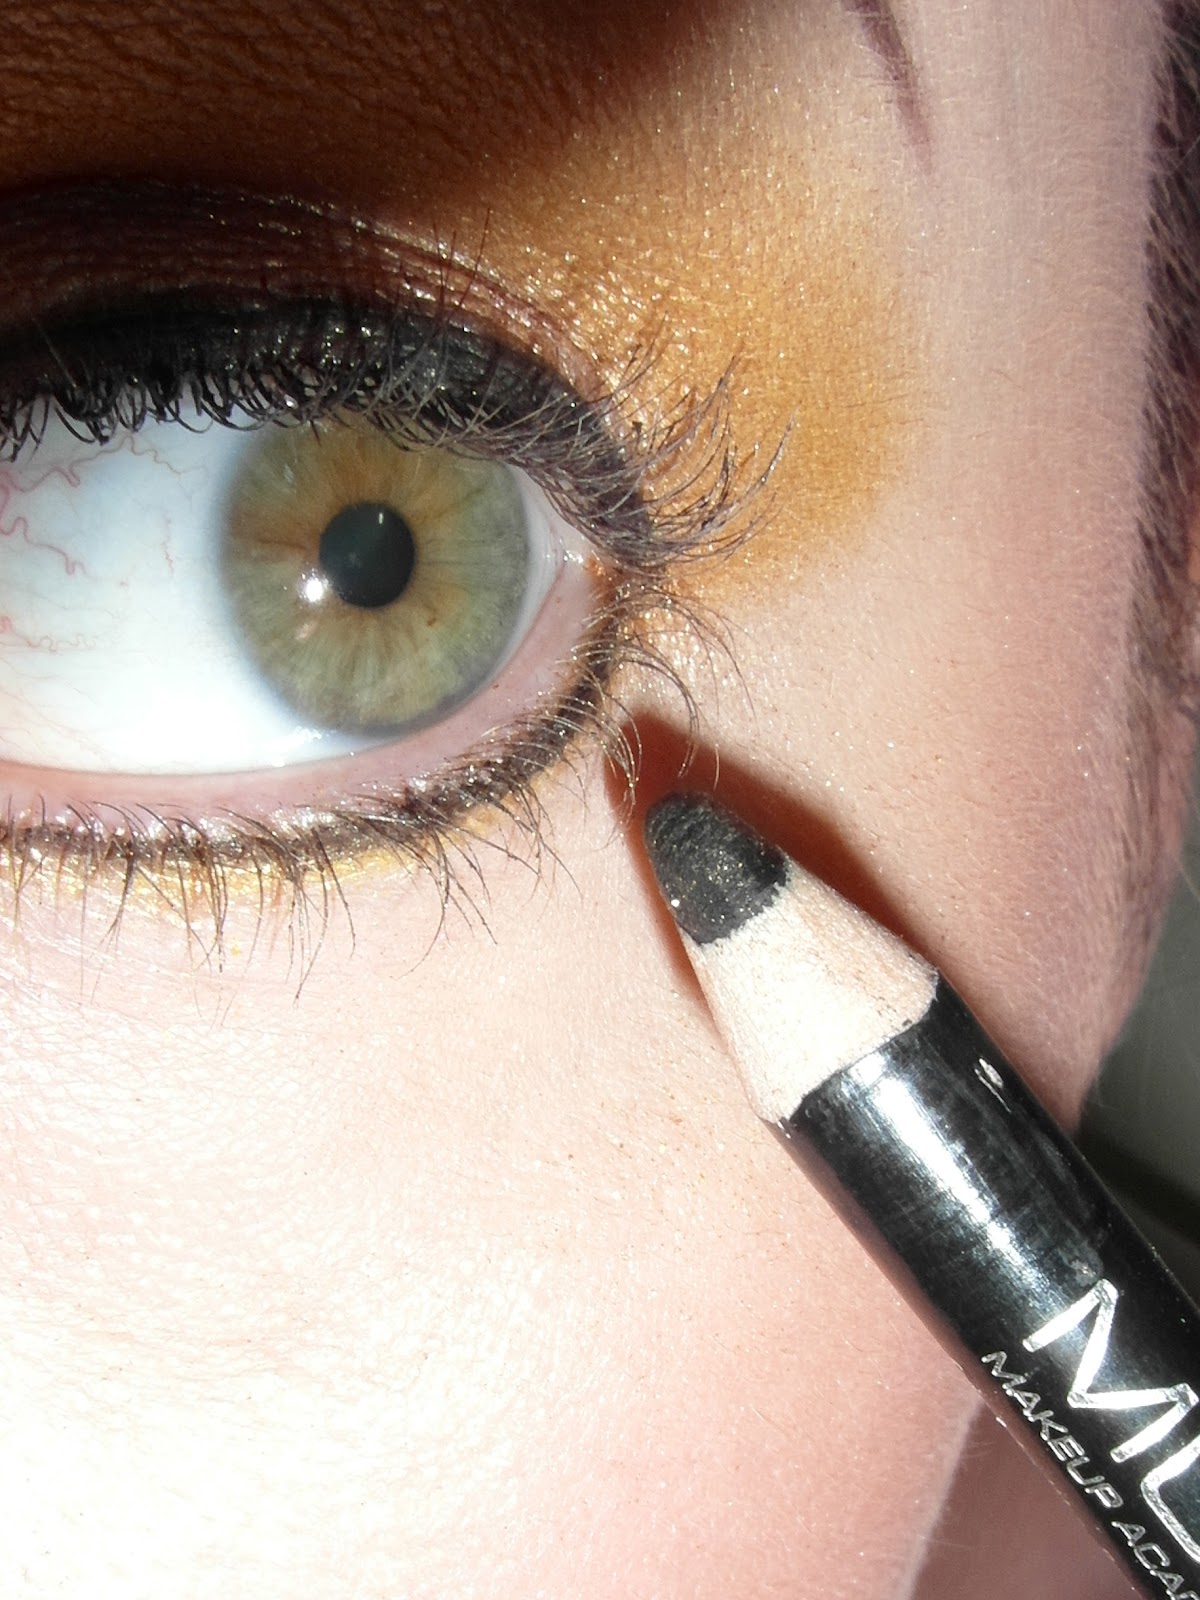
Once the gel liner was completely dry (MUA gel liners dry very quickly, so you don't tend to run the risk of getting the line on your eyelid when you look up - definite bonus!!) I applied a thin line of MUA's Intense Colour Eyeliner Pencil in Jet Black to my lower lashes.

© Gemma Peters - Make Up Artist 2012
Step Seven: 
Once completely happy with the eye make up I curl my eyelashes to add some extra definition and to help open up my eyes.

© Gemma Peters - Make Up Artist 2012
I then apply 2 coats of MUA's brand new mascara: Every Lash Volume and Lengthening in black (it smells like apples!!) 
To finish the look I apply a thin coat of MUA Intense Colour Eye Liner Pencil in Snow White to my lower waterline (step not shown). This really helps brighten the eyes and make them pop.  

© Gemma Peters - Make Up Artist 2012
Step Eight: 
Finish the look with a coat of your favourite MUA lipstick or lipgloss.  I chose Out There Plumping Lip Gloss in Shocking Pink. 

© Gemma Peters - Make Up Artist 2012

And that's it. My step by step guide on how to create the dazzling Going For Gold eye look.  

© Gemma Peters - Make Up Artist 2012

Have fun re-creating this look and, if you do, please tag me in the photos or post them to my Facebook Page 

Until next time, 
Stay Beautiful. 
 ~ Gemma <3


At the time of writing this blog the Going for Gold Eyeshadow Palette, Gel Eyeliner and Every Lash Mascara all have £1.00 off of their marked price on the MUA website so head over there and grab yourself a bargain!


DISCLAIMER
All of the views expressed within this blog are mine and mine alone.  
I am in no way affiliated with any of the companies/products mentioned or their employees. 
All of the products mentioned within this post are mine and were bought and paid for by me. 
All images in this Blog are taken by me, unless stated otherwise. PLEASE DO NOT take my photos without my prior knowledge/consent.


10 May 2012

To BB or not to BB...

BB Creams...are they worth the hype? Here's what I think:

For those of you that haven't heard of a BB Cream I'll do a quick introduction. BB Cream, also known as Blemish Balm, Beauty Balm or even Blemish Base originated in the East and was designed to act like foundation in covering common skin issues such as redness, dark circles, brightening dull complexion, etc., but to be a lot lighter in feel.  If you want more information on BB Cream, it has it's own little page on Wikipedia

Once BB made its way over here and practically exploded onto the market, needless to say, most Cosmetic/Beauty Manufacturers decided to bring out their own version of "BB".  

Most "English" BB Creams that I have come across seem to have 5-in-1 properties, claiming to moisturise, prime, conceal, cover like a foundation and give SPF protection.  If the claims be true then great! I know it will save me plenty of time in the morning - 1 bottle to do 4 jobs (I don't apply sunscreen as I tend to use foundations with it in).  

Since I first started using make up I have always used a separate moisturiser, concealer (when needed), foundation and then powder to finish. In the last couple of years I have introduced a primer into that too so, needless to say, I was intrigued by these little bottles that promise to do all of the above in one easy step.  So, with this in mind, I decided that I would trial various BB Creams (those which my budget would allow) and weigh up the pros and cons of BB Cream -v- the Separates Method.  

I decided that I would trial foundations in my usual way with moisturiser, primer, concealer, etc., and the BB Creams with just a moisturiser first.  

There is, of course, such a wide choice of foundations/BB Creams available so I did aim to try a variety. 

© Gemma Peters 2012
I am not about to review every single foundation in the picture as this is more about the BB Cream.  That said, if you would like me to review any/some of them in a separate blog post, please let me know.  

We all know that, whether it's the likes of the Rimmel Minerals, Barbara Daly or Maybelline's Souffles or Mousse, Calvin Klein's Super Hydrating, Clinique's Anti-Redness or even MUA's £4.00 offering, foundations are designed to, as a rule, give a medium to full coverage and can be used alone, over a primer, mixed with a moisturiser, set with a powder or even mixed together.  

(These are some of my favourites at the moment, each for their own individual reasons). 
© Gemma Peters 2012


Foundations are designed to be exactly that, the foundation for your make up. Good, or indeed bad, foundation can literally make or break a look.  We've all seen the "I've Been Tango'd" faces haven't we? Regardless of how stunning that girl is, how perfect the rest of her may be, nothing will distract you from the orange face or, even worse, the obvious, "I've applied orange foundation to my face and stopped at the jaw line" mask!  I, begrudgingly, hold my hand up and admit that, in the past, I have fallen fowl of the odd orange episode and, I'm sure if we're all being honest, so have a few of you lovely readers...

So, BB Creams. Do they provide the same coverage as a foundation? Or are they just glorified tinted moisturisers? 

© Gemma Peters 2012

From what I can gather of BB Creams they come in literally 3 shades; Light, Medium & Dark but are pretty colour adaptive too. 

The first BB Cream I ever tried (so didn't really know what to expect) was Garnier's offering, their "Miracle Skin Perfector".  I'll be honest that this one, for me, set the bar incredibly high.  When it first comes out of the tube it looks very thick, almost "stodgy", but the second you touch it or blend it into your skin it dissolves in a creamy, mousse like liquid that is easy to work with and blend. It feels weightless, looks totally natural and "unifies" the complexion.  

I'd say it's coverage is light/medium but it is buildable.  It also smells divine too.  

Because I love this product so much I have been using it on a few of my Blushing Bride Clients (and their wedding parties) and all of them have loved the feel of it on their skin and it has shown it's adaptability with the variety of light to medium skin tones that I have dealt with.  

I, personally, do set this one with a powder if I have used moisturiser before applying because it gives that "dewy" finish (which I don't really like on me). If I apply it without a moisturiser it still goes on just as smoothly but I don't need a powder afterwards as I don't have a double hit of moisturiser on my skin, therefore I avoid the "dewy" look. 

The next BB Cream I tried was actually sent to me by MUA Cosmetics. I love MUA's products so, when I was at their Launch Party for their Collaboration with Love Hearts, I was so excited to learn that they were releasing their own BB Cream and, naturally, jumped at the opportunity to trial it.  

MUA's foundation is one of my 4 favourites at the moment so I was expecting great things from their BB "All in One Beauty Balm". 

This BB Cream says it "Primes, Smooths & Conceals" and "evens out skintone for a brighter, smoother complexion".  

Like with the Garnier, I moisturised first before applying this product. 

When the product came out of the tube it felt heavy in comparison to the Garnier one but, like I said above, I hadn't tried a BB Cream before Garnier so didn't know if that was the "norm" or not. 

I applied the MUA BB Cream with my fingers to start with, but have also used it with a foundation brush, a buffing brush and a sponge. 

To be honest, this cream, to me, feels and blends more like a foundation than cream and I do find it a little difficult to work with. I feel that you need to work quickly in order to get the product to blend else it seems to "settle" quite quickly.  

That said, the coverage of this product isn't as full as their foundation and offers a medium coverage with a lovely finish. It leaves your skin looking unified and healthy and can be worn alone or, as I like to do, set with a powder.  

I then decided to try Vivo's BB Cream.  Although I know MUA & Vivo are part of the same Cosmetic Family (fbBeauty) I assumed that the products would be different.  However, it seems to me that the Vivo and the MUA BB Creams are one and the same product, just in different packaging.  I was a little disappointed by this, but at least now I know. I won't be buying either of these BB creams again and, for me, they're too much like a foundation and, in honesty, I already use an MUA foundation so I don't need another one.  

Next to try was L'Oreal's Nude Magique BB Cream. 

I didn't know what to expect from L'Oreal as it is not a brand I tend to use too much.  I find them to be one of the over priced Cosmetic Lines, especially when you consider the likes of MUA that offer great products at a fraction of the cost. 

Nothing could have surprised me more than this BB Cream. It came out of the tube like water.  It was a white liquid (which felt nothing like cream) and it had "pearls" in it, which are designed to burst as you blend and add the colour. 

I dotted this product over my face (carefully to stop it dripping) and blended it in. 

I was very disappointed with this product. It felt abrasive and harsh against my skin and not in the least bit moisturising. The finish looked patchy and, in places, orangey. 

For the money L'Oreal ask for their products I really would have expected something better. 

Out of the BB Creams mentioned in this post, the only one I will be buying again will be the Garnier one. It, for me, is the one that feels the best, smells the best and performs the best.  


Until next time, stay beautiful. 
G xx 

Have you used any BB Creams? 
What one do you recommend? 
Do you prefer BB Creams, tinted moisturisers or foundation? 


DISCLAIMER
All of the views expressed within this blog are mine and mine alone.  
I am in no way affiliated with any of the companies/products mentioned or their employees. 
All of the products mentioned within this post are mine and were bought and paid for by me with the exception of the Make Up Academy (MUA) BB Cream which was sent to me for the purpose of review.  
All images in this Blog are taken by me, unless stated otherwise. PLEASE DO NOT take my photos without my prior knowledge/consent.


29 March 2012

First Look at FashionistA

Ok, so I am fibbing slightly about it being my "first" look because I already have one of their Magnetized Nail Polishes, but this is my first look at any of their face range.  

I have known of FashionistA for some time (even before I bought the nail varnish), but I had never tried any of their products.  

FashionistA isn't an expensive brand but, for me, the £4.00 that I would spend on one of their solo shadows, I could buy an entire 8 colour MUA Cosmetics Eyeshadow Palette! However, now that I have all of the MUA Palettes I didn't really have an excuse.  

I was having a mooch around Maidstone today and, as is expected (by myself if no one else) I had to go in Superdrug! 

Straight up the make up aisle having a child in a sweet shop moment, I saw the FashionistA stand and decided to have a closer look.  

From what I know of FashionistA they offer a range of solo eyeshadows and blushers which you can "pop" out of their casing to customize your ideal palette, which has room for 4 shadows.  

At £5.00 per empty palette and £4.00 for each eyeshadow/blush I had, as mentioned above, previously passed the FashionistA stand by, despite all of the beautiful colours trying to entice me.  Today however, I decided that I would finally buy at least 1 FashionistA eyeshadow. I then noticed that if you bought the palette and 4 solos to fill it you would save £9!, basically buying 3 solos for £12 and then getting the 4th and the palette free...well how could I possibly pass up such a bargain.  

Now was the difficult bit, deciding which shadows I was going to get...

I decided to opt for 3 eyeshadows to create my preferred dramatic, smokey eye and 1 blush, all to be housed in a shiny black palette with FashionistA written all over the lid in a matted black.

© Gemma Peters 2012
When looking for my shadows I was instantly drawn to the baked ones, which have swirls of glittery colours going through them, so I decided it had to be 3 of them.  

The first one I got, which will act as my highlighter is BELLA. A beautiful, shimmery white with swirls of iridescent white and bronze/gold through it.  This shadow is super shimmery and I can't wait to use it!

© Gemma Peters 2012

The next colour I went for was BEWITCHED, which is a gorgeous mid purple tone with dark purple, pink and silver swirled through it. 


© Gemma Peters 2012

The last eyeshadow I decided to get (today at least) is GLOBE, which is an almost Royal Blue, with light blue, silvers and the same gold/bronze from Bella swirled through it.  


© Gemma Peters 2012

All of the eyeshadows that I picked are super shimmery and, therefore, may not be to everyone's tastes but, that is the beauty of FashionistA; YOU decide what colours you have in there so there is no more buying a palette and only using a few of the colours.  

I decided to make my 4th shade one of their blushers.  I went with Shade 11, GLOWING as it's the one that I think will match my skin tone.  As a rule I use baked/mosaic blush because I find them more adaptive to my skin tone, so I am quite looking forward to seeing how this performs in comparison.  

© Gemma Peters 2012

I am pleased that I have finally bought some FashionistA make up as all I have ever heard about them has been good.  FashionistA is part of the fbBeauty Family and, being an avid lover of MUA, I am expecting great things! 

I swatched the testers of the shades I bought when I was in the store and even from the lightest of touch I ended up with a load of the product on my fingers so I feel that these are going to be real value for money! 

I will of course let you know how I get on when I use the products on my face. 

© Gemma Peters 2012

Until next time, stay beautiful.
Gem xx


Have you used any FashionistA products? 
Do you have a favourite FashionistA eyeshadow? 
Do you have any FashionistA "must buys"? 


DISCLAIMER
All of the views expressed within this blog are mine and mine alone.  
I am in no way affiliated with FashionistA, fbBeauty or any of it's employees. 
All of the products mentioned within this post are mine and were bought and paid for by me. 
All images in this Blog are taken by me, unless stated otherwise. PLEASE DO NOT take my photos without my prior knowledge/consent.  

05 March 2012

Monday Morning Make-Up

So, we've all been there, and probably will be again.  You've either had a really good weekend, or perhaps a bad night's sleep and then, before you know it, the alarm is going off and it's time to get up for work, the school run, maybe even a meeting.  If you want to carry on having the good weekends but at least make it look like you're fresh faced and ready to face the day, then follow this little make up routine and you'll have everyone, perhaps even yourself, fooled into believing that you got a good night's sleep and are feeling as fresh as a daisy! 

The first thing I started my look with this morning was Garnier's Miracle Skin Perfector (BB Cream).  I received a sample of this over the weekend and, after trialling it yesterday, I decided it would be perfect for a Monday morning lift. 
©Garnier 2012
Now, I have known of BB Creams for some time but this is the first one I have actually tried and I was so pleased with the result.  I will be doing a "BB Blog" in due course so that I can go into the results, etc. 


This BB cream gave me the coverage I need for a Monday morning and really illuminated my skin, but without the need for a separate primer, concealer & foundation.  


If you like the "dewy" look then you could just leave the BB cream without any powder, I however prefer a slightly more matted base, so I then dusted with Make Up Academy (MUA)'s pressed powder in Shade 1. 


To then add some extra luminosity and radiance I swept Vivo's Baked Bronzer in Shade 3 (Healthy Glow) over the apples of my cheeks, my cheekbones, forehead, nose and chin.  
© Gemma Peters 2012
The benefit of using this particular shade of Bronzer is that it isn't orangey/dirty looking, instead the gold undertones catch the light and leave skin looking fresh, luminous and healthy.  


I then brushed Vivo's Baked Blush in Shade 1 (Peaches and Cream) on to the apples of my cheeks to give a healthy coloured glow. 
© Gemma Peters 2012
This shade of blush has pink undertones which suits my skin tone perfectly and gives me an instant "boost".  Vivo offer a range of Baked Blush so, if this particular shade doesn't suit your skin tone, I am sure you will find one in their range that does.  


Usually, for tired looking eyes, I would recommend a neutral matted shade but, today, I felt like being different so I decided to use the Baked Bronzer and Baked Blush as my eye colours! 
© Gemma Peters 2012
I swept the Baked Bronzer all over my eyelid, up to and including the brow bone.  It gave a nice shimmer without being too shimmery, and instantly brightened my eye area.  I then swept the Baked Blush over the lid up to the crease.  I only applied a light coat and it gave my eyelids a beautiful peachy tint, without turning them coral tinted! 


After lightly curling my eyelashes to help "open the eyes" I applied 1 coat of Vivo's lengthening mascara in black. I then lined my waterline with Make Up Academy (MUA)'s Intense Colour Eyeliner Pencil in Snow White which helps to make the eyes look brighter and really "pop". 
© Gemma Peters 2012
To finish and frame my eyes I enhanced my brows using Vivo's Ultimate Brow & Eye Kit.  Make up on the eyes always helps to make them look better, but nothing frames the eyes better than a good set of brows! 
© Gemma Peters 2012
For the lips I applied Make Up Academy (MUA)'s lipstick in Shade 11 which, on me, is a pretty, dusky pink.  
© Gemma Peters 2012

That on it's own looked good but to add that extra bit of moisture I topped it off with Make Up Academy (MUA)'s Love Heart Tinted Lipbalm in "Great Lips".  


And that's it, my Monday Morning Make Up Look.  This of course can be used any day of the week when you need a bit of a pick me up for your face.  
© Gemma Peters 2012
Hope this helps with the Monday morning blues.  


Until next time, stay beautiful.
Gem xx


What is your Monday Morning Make Up Routine? 
Do you have any tips for making it at least look like you're ready to face the day?


DISCLAIMER
All of the views expressed within this blog are mine and mine alone.  
I am in no way affiliated with any of the companies/products mentioned or their employees. 
All of the products mentioned within this post are mine and were bought and paid for by me.  
All images in this Blog are taken by me, unless stated otherwise. PLEASE DO NOT take my photos without my prior knowledge/consent.

03 March 2012

My First Vivo Experience

Ok, following on from yesterday's Vivo haul here is, as promised, my review from my first experience of using Vivo products.  

I decided that I was going to try out the baked blusher & baked bronzer.
©Gemma Peters, 2012
©Gemma Peters, 2012

The eyebrow kit. 
©Gemma Peters, 2012
©Gemma Peters, 2012


The Diamond Sparkle Lip Gloss in Candyfloss (the one in the middle of the picture).
©Gemma Peters, 2012


 The lengthening mascara (pictured on the left)
©Gemma Peters, 2012


And the Baked Shimmer Palette in "Chocolate Box".
©Gemma Peters, 2012
 

Once I'd applied my usual foundation and powder the first product I was ready for was the Baked Bronzer.  I had no idea how I expected this to turn out, but have only ever heard good things about them so my expectations were high.  

The shade I have is Shade 3, Healthy Glow - "A stunning bronzer with gold undertones that leave your complexion sun-kissed and gorgeous"
 
I started by applying the product to the apples of my cheeks and sweeping it up and over my cheekbones, continuing down my nose, across my forehead and lastly a dusting on my chin.  I wouldn't say that this particular shade left me "sun-kissed", but then I wouldn't call this a typical bronzer either.  

Unlike most bronzers which either leave you looking "dirty" or "tango'd" this particular one didn't.  I don't know if it's just because I picked a really light shade, but I wouldn't class it as a bronzer. It certainly does leave your skin with a beautiful, healthy glow and almost gives the very in vogue "dewy" look. I found this product more like "radiance in a pot". It really brightened my skin and left it looking luminous and beautiful, but not in the same way a highlighter would.  It wasn't as shimmery as a highlighter, as I said, it was more "dewy".  

If you are looking specifically for a bronzer that gives you that "sun-kissed" brown/dirty look then I wouldn't recommend this product.  If however you are looking for a product that can make even dull "winter skin" look luminous and beautiful, then this is the one.  

I can't remember the price (and have lost the receipt), but I think it was around £5.00. Normally I wouldn't consider paying that much for a "powder/bronzer" but, after just 1 use and seeing how good it made my skin look, I definitely think that this is going to become a firm addition to my make up kit. In the summer I may even try it without foundation as I imagine it will compliment naturally sun-kissed skin beautifully.
 
Next it was on to the Baked Blush in Shade 1, Peaches & Cream - "A stunning blush with pink undertones to give all over warmth and colour to your complexion". 

This blush went on really smoothly and the colour is extremely buildable.  I was really impressed with the amount of product that I picked up on my brush after just one swirl. It was the perfect amount to give a beautiful, natural wash of colour.  

The blush is "shimmery" without being shiny and, combined with the bronzer, really gave my skin a healthy glow.  Perfect for combating winter skin dullness.  

I'm not sure if I would go out of my way to buy this blush again, purely because I do have a multi-tonal blush that I use on a daily basis and it suits my skin perfectly and is well within my budget.  However, if I were in Tesco and had a few spare pennies after buying the bronzer then I think the blush may well find it's way into my shopping basket.  

The next product to be put through it's paces was the Baked Shimmer Palette in Chocolate Box - "A specially baked formula enriched with high pigment colours for stunning eyes. Transform your eyes with this delicious array of eyeshadows baked into swirls of rich indulgent colours; sparkled with metallic silvers and golds that will add a touch of glamour to any occasion" (Complete with baked blusher to compliment any complexion).  

I didn't bother to swatch these colours before using them, instead I just jumped straight in and put them on my eyes. Thankfully I wasn't disappointed.  

I put "shade 1" (next to the blush) on my eyelid, "shade 2" was used to line my upper and lower lash lines, "shade 3" was put in my socket and "shade 4" was used just past shade 3 to blend the look together.  

These eyeshadows are so unbelievably lightweight. They practically glide onto the skin and blend/build incredibly easily.  The pigmentation is also wonderful and, due to the "marbled" effect, the colours are multi-tonal and catch the light beautifully.  I actually noticed a change in the socket colour when in my bedroom in natural, quite dark lighting and in the bathroom in bright artificial light.  In my bedroom the colour looked a darker brown, but in the artificial light (and perhaps with the aid of "shade 4") it took on a brown/mauve colour and looked really pretty with the rest of the eye make up.  

I do love the look of these eyeshadows and think the quality of them is great.  However, again, I am not sure that I would go out of my way to make sure I could buy them again as I do have plenty of eyeshadows from my "go to" brand that I love equally as much and that perform just as well for a fraction of the cost. 

After finishing with the eyeshadow it was on to the Lengthening Mascara - "Transforms lashes with dramatic effect". 

I was really looking forward to using the Lengthening Mascara as, after having a sneak peek yesterday, it looked really fibrous so I was expecting good things!

I am currently on a quest to find my "Ultimate Mascara" (see my video here) so thought I would kick the quest off with this mascara.  

I have to say that, for a mascara that boasts "dramatic effect" I was disappointed.  I don't think that my lashes looked all that much longer and were certainly not dramatically transformed.  

However, that said, this mascara coated my lashes beautifully with one stroke of the wand and didn't clump after 2 coats (without combing).  It did give lovely separation and definition of the lashes but not the length that I was hoping for after reading it's description.  

I wouldn't buy this particular mascara again but, if anyone out there is after a good all rounder of a mascara that will stay put all day, won't flake, won't clump but will provide good coverage and definition to the lashes then this may be the one for you.  I am still to try the volume mascara offering so who knows, maybe that will make it to my "Ultimate Mascara" Shortlist.   

To finish my eyes it was on to the Ultimate Brow & Eye Kit - "Work wonders with this exclusive Brow and Eye Kit that will add contour and definition to frame eyes perfectly for a professional look. Complete with a lightweight gel that will fix brows in place all day long".  

I decided to use my own angle brush, rather than the one provided with the kit (as this is too soft for my liking).  

I swept the "highlighter" shade under my brow to start with and then filled in with the mid shade.  To add definition I defined the edges with the darker shade.  I didn't use the brow gel this time around.  

I was pleased with the colour payout, blendability and longevity of this product.  I have been wearing it all day and it hasn't smudged or faded at all.  

I probably will be buying this product again as I like to switch between brow products (depending on the look I want to achieve) so it would be nice to have a product that I know I can depend on to give a natural finish that stays put all day.  

©Gemma Peters, 2012
©Gemma Peters, 2012

To complete the look I decided to use the Diamond Sparkle Lip Gloss in Shade 1, Candy Floss - "A colour intense formula with brush applicator that gives lips instant vibrancy and sparkle for a full and even coverage". 

Now, anyone who knows me will know that I am like a magpie for all things sparkly, which is the only reason I was so attracted to these lip glosses.  

After giving the tube quite a squeeze to get the product flowing I was really pleased with the coverage from just a small amount.  The gloss itself didn't feel too sticky or gloopy when on and didn't leave your lips with that "just fallen in a vat of syrup" feeling.  

Candy Floss is a really pretty, light pink and the gloss itself has a really nice shine. The glitter in this gloss though is amazing and really makes the lips sparkle - it catches the light like a mirrorball! 

I should think I will be buying the lipgloss again, mostly for the glittery shine that it can offer and then for the colour. 
©Gemma Peters, 2012
Overall I am pleased with my 1st Vivo experience and I do like the products however, I will mostly be sticking with my trusted "go to" brand for my day to day make up and my quest to find my "Ultimate Mascara" continues... 

Until next time, stay beautiful.
Gem xx


Have you used any Vivo products? 
If so, what are your faves? 
Do you have any Vivo "must buys"? 


DISCLAIMER
All of the views expressed within this blog are mine and mine alone.  
I am in no way affiliated with Vivo or fbBeauty or any of it's employees. 
All of the products mentioned within this post are mine and were bought and paid for by me.  
All images in this Blog are taken by me, unless stated otherwise. PLEASE DO NOT take my photos without my prior knowledge/consent.  


Blog Template by YummyLolly.com
Sponsored by Free Web Space